The Return Of Disassembly Desynchronization
Disassembly desynchronization is a well-known anti-disassembly technique used to induce incorrect disassembly. Newer disassembler like Binary Ninja is still vulnerable to it. More established disassembler like IDA has a fix for it, but the fix inadvertently makes another anti-disassembly technique more stealthy and can also be used to hide instructions. In summary, that’s what this post will be about. And without further ado, let’s start.
Disclaimer: CFG (control-flow graph) recovery and functions identification are still unsolved problems. Obviously, adding anti-disassembly to the mix only makes them even more of a headache. So in no way is this post trying to poke fun at the current state of reverse engineering tools for not handling this particular edge case correctly.
How It Works
Disassembly desynchronization causes incorrect disassembly by placing data bytes at locations that a disassembler will expect to contain instruction bytes. Such magical locations can be found following control-flow altering instructions (e.g. CALL and JCC). For example, execution doesn’t necessary have to return to the instruction following a CALL after the subroutine finishes; the subroutine’s return address can be purposely altered during subroutine’s execution, which grants us the freedom to place data bytes following CALL to disrupt disassembly since execution will never flow there. Same idea with unconditional JMP that is disguised as a JCC instruction, as seen in this assembly code snippet:
...
xor eax, eax
jz always_jump
db 0xeb
always_jump:
...
Although JZ (jump if zero) is a conditional jump instruction, the XOR that precedes it makes sure the branch is always taken. We can insert a data byte after JZ and since genuine instructions should follow either true or false branch, a disassembler might try to disassemble starting from that data byte, causing some numbers of the instructions it disassembles from that point on to be fake.
This technique is well-documented in academic papers and books, most notably Practical Malware Analysis, Ch.15 and The IDA Pro Book 2nd Edition, Ch.21.
Disassembly Desynchronization In Binary Ninja
Below is a simple program utilizing disassembly desynchronization:
section .text
global _start

culprit:
xor eax, eax
jz always_jmp
db 0xeb ; <---- data byte to throw off disassembly
always_jmp:
ret

_start:
    mov ebx, 1
    call culprit
    xor ebx, ebx
    mov eax, 0x1
    int 0x80
Example Code #1
nasm -f elf32 -o [object] [assembly] && ld -m elf_i386 -o [binary] [object]
And this is how the culprit function looks in Binary Ninja:
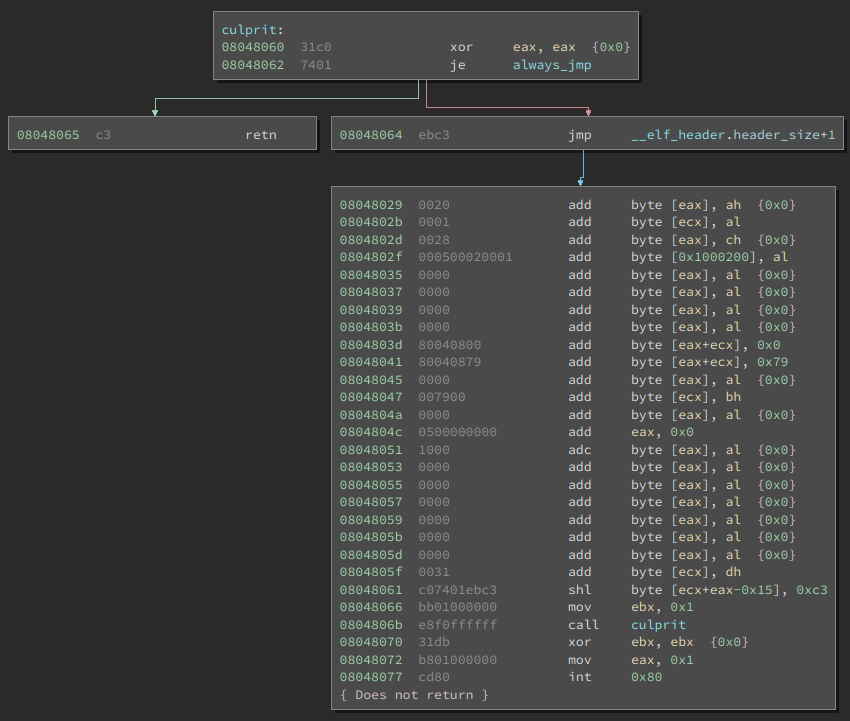
Figure 1: Binary Ninja's disassembly of culprit function from Example Code #1
The purposely placed 0xeb data byte (also opcode for JMP) is disassembled as part of jmp __elf_header.header_size+1. The non-existent jump destination causes more data bytes to be misinterpreted as instructions (0x8048029 to 0x8048061) and the _start function to spill into the culprit function (0x8048066 to 0x8048077).
We can hide the _start function from spilling into culprit function by adding another 0xeb data byte right before _start. This results in the disassembly to be even more incorrect as none of the basic blocks steaming from the false branch contains a genuine instruction:

Figure 2: Disassembly of culprit function with added data byte before _start
Back in October of last year, the Binary Ninja team published a blog post called “Automated Opaque Predicate Removal”. Opaque predicate is a boolean conditional that always evaluate to the same value; it is the backbone of disassembly desynchronization since we need a disguised conditional statement to cause execution to always jump over data byte. In that post, it talks about how Binary Ninja is able to identify opaque predicate through its dataflow analysis, which can determine whether if the condition for a conditional statement is constant. If we run the automatic opaque predicate patcher that comes with the post, we now see that the disassembly correctly reflects how the code will be executed:
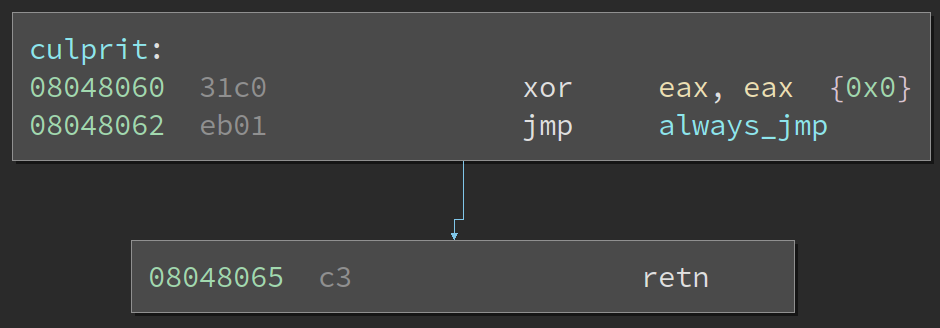
Figure 3: Disassembly of culprit function after running automatic opaque predicate patcher
As wonderful as it is, Binary Ninja’s dataflow analysis is not perfect. Toward the end of the post, it lists out some limitations that will cause its dataflow flow analysis to fail to recognize opaque predicate. One limitation is that dataflow analysis will not work on writable segments. So if the predicate is based on value on the stack, Binary Ninja won’t try to determine that value. Common C calling conventions like CDECL and STDCALL push function arguments on the stack. To change our previous code so that the automatic opaque predicate patcher won’t work properly, we just need to pass in the value of EAX as a function argument:
section .text
global main

culprit:
    push ebp
    mov ebp, esp
    mov eax, dword[ebp+0x8]
    test eax, eax
    jz always_jmp
    db 0xeb
    always_jmp:
    mov esp, ebp
    pop ebp
    ret

main:
    push ebp
    mov ebp, esp
    xor eax, eax
    push eax
    call culprit
    mov esp, ebp
    pop ebp
    ret
Example Code #2
nasm -f elf32 -o [object] [assembly] && gcc -m32 -o [binary] [object]
Opaque predicate like the one above is resilient against Binary Ninja’s dataflow analysis but it is not stealthy against human detection. A human glancing over the disassembly can still easily tell that EAX will always be zero. To make it stealthy, we need a non-trivial opaque predicate, which can be achieved using algebraic predicate like x(x+1) % 2 == 0.
We can replace our old opaque predicate xor eax, eax with this new one while passing the value for the unknown variable ‘x’ as function argument to satisfy both resiliency and stealthiness:
section .text
global main

culprit:
    push ebp
    mov ebp, esp
    mov eax, dword[ebp+0x8]
    add eax, 0x1
    imul eax, dword[ebp+0x8]
    and eax, 0x1
    test eax, eax
    jz always_jmp
    db 0xeb
    always_jmp:
    mov esp, ebp
    pop ebp
    ret

main:
    push ebp
    mov ebp, esp
    xor eax, eax
    push eax
    call culprit
    mov esp, ebp
    pop ebp
    ret
Example Code #3
nasm -f elf32 -o [object] [assembly] && gcc -m32 -o [binary] [object]
Disassembly Desynchronization In IDA
Older versions of IDA are vulnerable to disassembly desynchronization too, but it seems like the newest free version of IDA (v7.0) has the problem fixed:
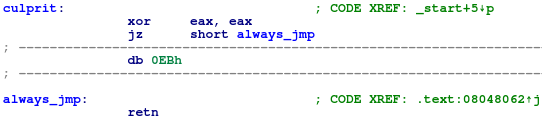
Figure 4: IDA is able to automatically recognize the purposely misplaced data byte
How about let’s make sure the false branch is always taken? Will IDA try to disassemble the data byte then? Let’s find out:
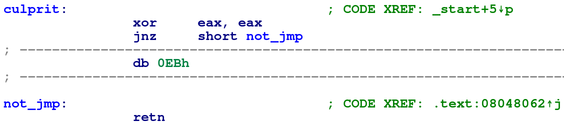
Figure 5: IDA doesn't try to disassemble data byte even though it will be reached during execution
Hmm it doesn’t… It seems to me that IDA isn’t using dataflow analysis like Binary Ninja to identify that only one of the branches can be taken; rather, it is probably using some forms of pattern matching against typical disassembly desynchronization code pattern and making the assumption that if the pattern matches then disassembly desynchronization must be at play so it only disassembles from the destination of the true branch.
Can we exploit this newfound assumption made by IDA? Yes we can.
We can use this assumption to make IDA not disassemble genuine instruction by placing genuine instruction at destination of the false branch. To accomplish this, we also need to overlap instructions at both true and false branches:
section .text
global _start

culprit:
xor eax, eax
jnz not_jmp
db 0xb8 ; <----- if disassembled from here inserted data bytes become: mov eax, 0xc8d1c031
not_jmp:
db 0x31 ; <----- if disassembled from here inserted data bytes become: xor eax, eax; ror eax, 0x1
db 0xc0
db 0xd1
db 0xc8
ret

print_result:
mov ebx, 0x1
mov eax, 0x4 ; sys_write
int 0x80
ret

_start:
    call culprit
    test eax, eax
    jnz not_zero
    ; "EAX is zero"
    mov ecx, zero
    mov edx, zeroLen
    jmp time_to_print
not_zero:
    ; "EAX is nonzero"
    mov ecx, nonzero
    mov edx, nonzeroLen
time_to_print:
    ; print "EAX is zero" if culprit's return value is zero
    ; print "EAX is nonzero" otherwise
    ; IDA's disassembly of culprit will make it look like "EAX is zero" will be printed
    ; But when executed, "EAX is nonzero" is the one that's printed
    call print_result
    xor ebx, ebx
    mov eax, 0x1 ; sys_exit
    int 0x80

section .data
    zero db "EAX is zero", 0xa
    zeroLen equ $-zero
    nonzero db "EAX is nonzero", 0xa
    nonzeroLen equ $-nonzero
Example Code #4
nasm -f elf32 -o [object] [assembly] && ld -m elf_i386 -o [binary] [object]
The culprit function will always return a nonzero value even though IDA’s disassembly of culprit makes it look like it will always return zero (obviously the xor eax, eax instruction is a dead giveaway that the disassembly is wrong but we can easily replace that with a non-trivial opaque predicate as discussed in the previous section):

Figure 6: IDA's disassembly of culprit shows that it will return 0 when in reality it returns a nonzero value
This is because the bytes right after the jnz not_jmp instruction in culprit, 0xb831c0d1c8, disassembles to the instruction mov eax, 0xc8d1c031. If we skip 0xb8 and disassemble starting from the not_jmp label then it disassembles to xor eax, eax; ror eax, 0x1 as displayed by IDA. But since the jump will never take place, mov eax, 0xc8d1c031 is the instruction that will be executed.
One thing I really liked about IDA is the ease of updating the disassembly with the c (code) and d (data) hotkeys that allows you to change a portion of bytes from code to data or vice versa. To fix the disassembly, we use the d hotkey to change the xor eax, eax; ror eax, 0x1 instructions to data and c hotkey to disassemble from the 0xb8 byte. The disassembly now correctly reflects execution:

Figure 7: IDA correctly shows culprit's disassembly after manually fixing it with the 'c' and 'd' hotkeys
Aside from hiding instruction, we can also use IDA’s assumption to make genuine overlapped instructions more stealthy.
Normally IDA will not be able to display overlapped instructions. Instead, it will highlight it for the user in red to let user know that something funky is going on:

Figure 8: Overlapped instructions in IDA
The example above is taken from Practical Malware Analysis, Ch.15. The bytes in questions are 0xebffc048. 0xebff will translate to jmp -1 (shown as jmp short near ptr culprit+1 in IDA), meaning that the instructions that follows will be in the middle of the JMP: 0xffc048 or inc eax; dec eax. The problem, as shown in Figure 8, is that IDA can’t displays this assembly sequence since 0xff is a part of both JMP and INC.
To make the use of overlapped instructions more stealthy, we can use IDA’s fix for disassembly desynchronization to only display one part of the overlapped instructions while completely hiding the other one:
culprit:
test eax, eax
jnz it_depends
db 0xb0 ; <----- if disassembled from here inserted data bytes become: mov al, 0x1; ret
it_depends:
db 0x01 ; <----- if disassembled from here inserted data bytes become: add ebx, ecx
db 0xc3 ; <----- also opcode for ret
ret

_start:
    ; assumes there's code here that sets eax in a non-trivial way...
    call culprit
    ; does something with the result
    xor ebx, ebx
    mov eax, 0x1 ; sys_exit
    int 0x80
Example Code #5
nasm -f elf32 -o [object] [assembly] && ld -m elf_i386 -o [binary] [object]
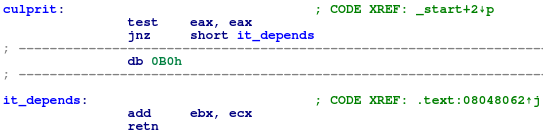
Figure 9: Although 'mov al, 0x1' can also be executed, it is not disassembled
Both the true and false branch in culprit can be taken. If the false branch is taken, 0xb001c3 or mov al, 0x1; ret will be executed and since conveniently 0xc3 is the opcode for ret it will just return to the caller right after the assignment. And if true branch is taken, 0x01c3 or add ebx, ecx will be executed instead, also follows by a ret. Yet, IDA can only show the branch leading to add ebx, ecx, without giving any hint that actually both branches can be taken.
Conclusion
Whether you are using disassembly desynchronization to mess with disassembly, to hide instructions, or to hide overlapped instructions, its resiliency and stealthiness are mainly dependent on the employed opaque predicate.
More on opaque predicate in the next post. Stay tuned!